
But, after he received a Lego Star Wars Advent calender, with little miniature ships and such that you put together every day, and in light of our Christmas tradition of watching Star Wars, I decided to make him a felt Star Wars Advent calender.
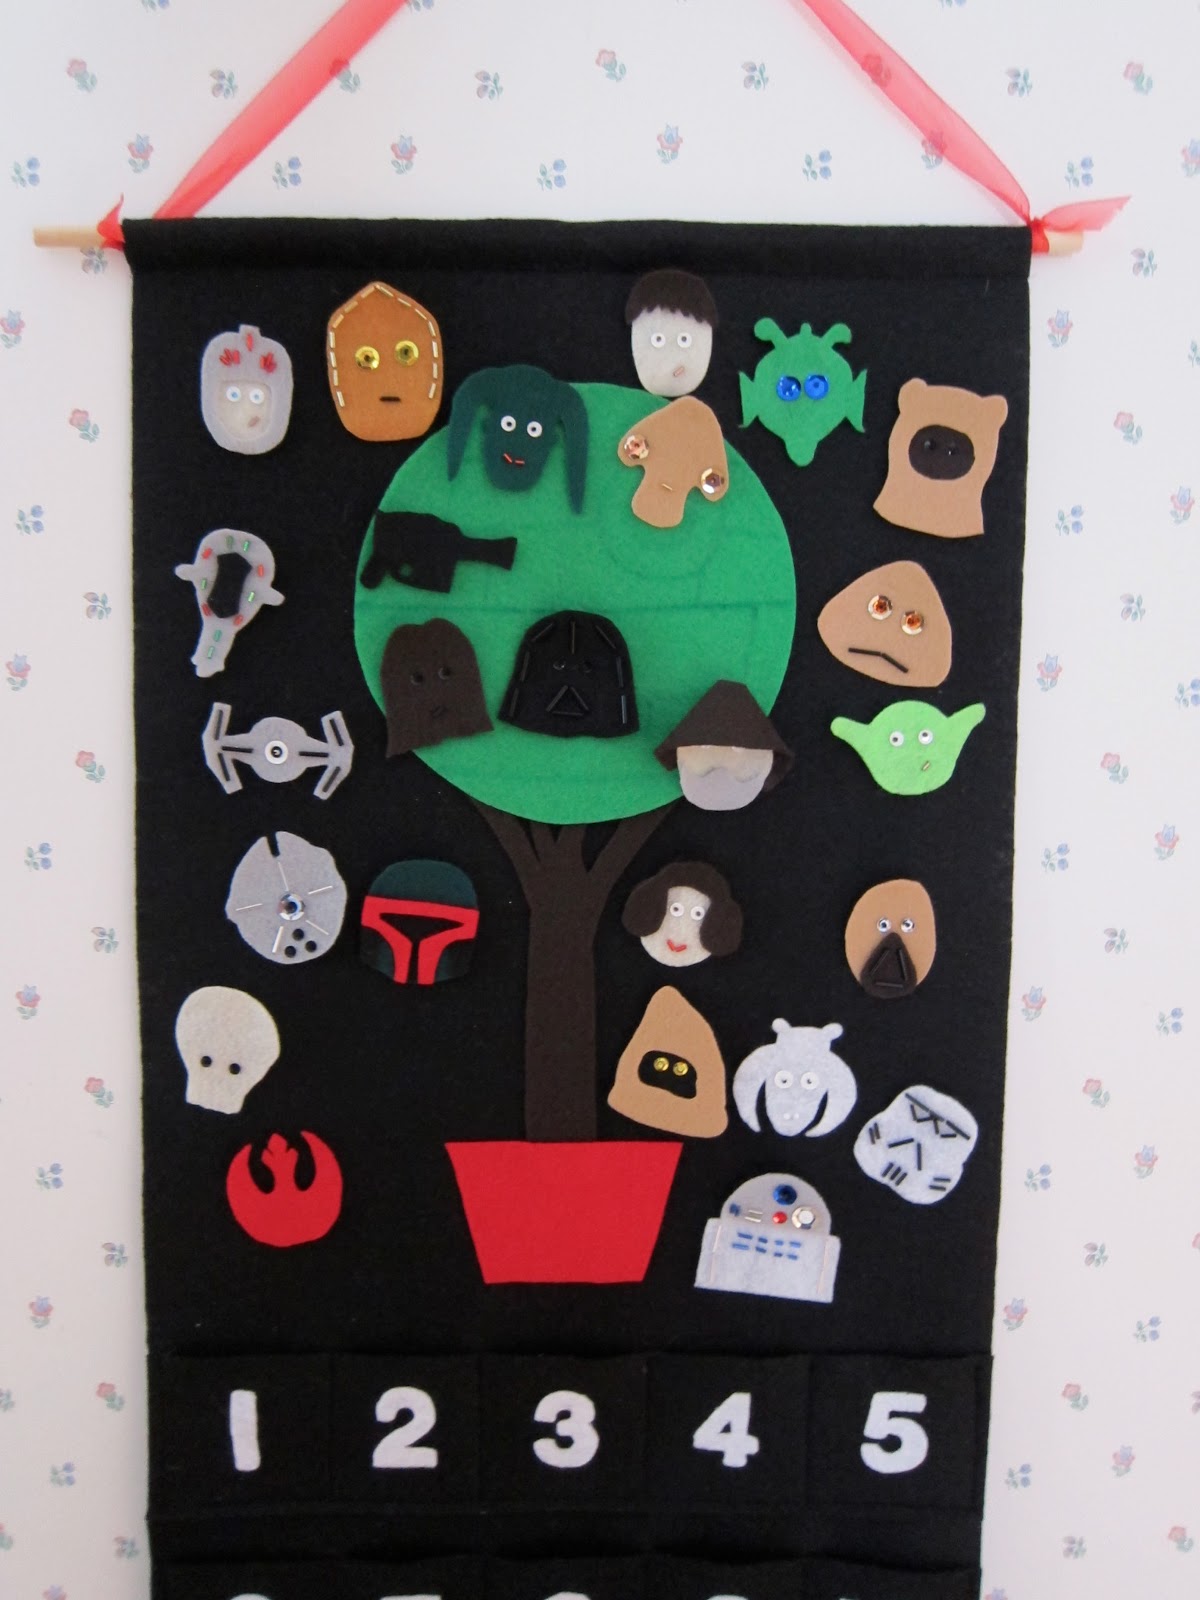
I told all my crafty friends about it...most rolled their eyes, some thought it was awesome, and some just didn't get the point or the tradition involved with the advent calender in our home. As the year went by, I slowly went forward with my plans...I bought all the felt and beads in July, and made an epic powerpoint with all of the possible characters and ships that I could turn into ornaments. A Threadless shirt called "Dark Side of the Garden" provided me with the inspiration for the tree.

And I was lucky to have the help of a wonderful friend for the background and pocket cutting and sewing.
But then it was November. And I wasn't close to done. Finally, I spent a full day during Thanksgiving weekend going character by character, trying to come up with the final 25...felt was everywhere, and I was not happy. One of the things about felt is you can't really make it too thin, unless you want to have a background felt to glue it on, which wasn't the look I was going for. So, my thoughts of AT-ATs and X-wings, nixed. And at the end of the day, Star Wars is kind of a grungy universe of duller colors, which is fine, but does not please my rainbow-seeking sensibilities. Luckily, after perusing Wookieepedia (yes, it exists), I found my 25 pieces, and took care of the cutting and gluing (thank you, genius felt glue from Amazon).

I hand-carried my hard work in a pillowcase on the plane, and then waited with bated breath for Christmas Eve.


Things I learned:
1. If you've never worked with felt before, do yourself a favor and buy a sheet and just mess around with it. Find out if your scissors are good enough for detail work, figure out how thick and thin you have to make things to be stable. (I have these scissors; they are perfect for cutting felt at this size, but they are uncomfortable...you will have to take breaks). Also, check how long it takes for you to sew certain beads or sequins with the thread you have. Some people working with felt really like embroidery floss, but I find it too thick for the beadwork. It's great for simple blanket stitches, though. I used Madiera polyester thread, and it worked just fine. Also--this is a chance to check if your needles go through all of your beads and don't get stuck.
2. If you want to go and make up your own themed Advent calender, which I totally think you should, think about possible characters and colors first. People are the hardest to make look realistic...the aliens and robots were far more fun to do, and they look cooler. You can also make things easier by giving each ornament a circular background, which makes things more stable, especially if you have young children. Ideas for other advent calenders I'm now throwing around (but definitely not doing this year!)
--Game of Thrones sigils
--Harry Potter
--steampunk ornaments (think of the bling!)
--Lord of the Rings (with an Ent Tree! Can you imagine?)
--Sesame Street
--The Muppets! (especially themed with my absolute favorite Muppet Family Christmas)
--The Grinch Who Stole Christmas
--Sports teams
--Woodland Christmas (one of my favorite Christmas books growing up was all the animal families in the forest decorating a tree together)
--Swedish red and white
--Pokemon
The possibilities are endless.
3. Bling looks cool. But it takes forever. Be warned.
4. When ordering a "rainbow' sequin pack, check what colors are included in rainbow. In my case, black and brown were not, which led to some difficulties late in the game when I did not have time to reorder more.
5. At the end of the day, you can get away with ordering rainbow packs of beads and sequins and be mostly all set to go. But if you see yourself doing more work with these materials, consider buying individual packs already sorted. I like Specialty Bottle for their tin storage, and TCT2 are the perfect size for the smaller packs of beads. Unless you pack them completely full, they will stay closed even when you drop them on the floor. Consumer Crafts has the cheapest crafting materials that I've seen, and they have frequent sales.
6. When doing the machine sewing of black felt with black thread, I was...nervous. The thing that I had to remember was that this is a homemade piece that is kitschy; it is not meant to be perfect. That said, to ensure that pockets were a somewhat consistent size, I cut a square of light cotton fabric to match the pocket size and then pinned into place as a guide for my stitches.
7. A great resource for simplified Star Wars characters for inspiration in my felt designs was actually Star Wars cookies. Who would have thought?
8. The numbers are actually quite difficult to cut, so bear this in mind when choosing a font. Go thick, and go simple.
9. I used 2 inch T pins for each ornament; I tried sewing them on but that was a giant failure. Felt glue to the rescue!
10. After trial and error, here are the steps for each ornament:
--cut
--decide which beads/sequins go where
--if sewing is being done on the top layer of a two-layer piece, sew these on first (it is nearly impossible to sew through the glue)
--glue
--sew on the rest of the beads--remember to dot the beginning and end of each knot with glue to best seal your handiwork
--glue on the T pin
3 comments:
Dude, this turned out AWESOME!!!! I love it!!!! All your hard work totally paid off!
1.) You should be commended for pulling from the Holy Trilogy and not from the blasphemous lesser movies. Clearly there is hope for the future.
2.) Can I be your younger brother some Christmas?
1. Ha, the general thought was to keep it consistent, and given our love of the original movies, it made sense. Though, to be clear, (nerd alert!) I do love the bits and pieces I've seen of the Samurai-Jack animated Clone Wars series, and I am totally pulling for Disney to focus on the Knights of the Old Republic to avoid all of the problems that come with disturbing the original films, as Lucas has found out. But we'll see...
2. I wish that I had more time to devote to fun projects like this, but right now I simply don't. But--I would say that this sort of thing isn't impossible for someone with very little sewing experience. It does take practice and time, but very little talent is required (meaning that if someone like me could do it, you could do it, too!)
Post a Comment